Security camera wiring is the process of installing cables that carry power and data between surveillance cameras and recording or monitoring equipment. Getting this right determines whether your system runs reliably for years or fails at the worst possible moment. The two most common cable types are coaxial and Ethernet, and choosing between them shapes every decision that follows. This guide covers wired security system fundamentals, cable selection, installation steps, and the expert tips that separate a clean install from a frustrating one.
What is security camera wiring and why does it matter?
Security camera wiring is defined as the structured cabling that connects cameras to power sources and recording devices within a surveillance system. The cable carries two things: electrical power to run the camera and a video or data signal back to the recorder. Without a properly installed cable path, even the best camera hardware delivers unreliable footage.
Most residential and commercial systems use one of two cable families. Coaxial cables, specifically RG59 and RG6, serve analog CCTV systems. Ethernet cables, Cat5e and Cat6, serve IP cameras and Power over Ethernet (PoE) systems. The choice between them affects picture quality, maximum cable run distance, and how much labor the installation requires.
Local building codes govern how low-voltage cables are run inside walls and ceilings. Fire-rated areas require plenum-rated cables that resist flame spread. Post-installation testing should confirm motion alerts, night vision activation, and video retention of 14–30 days. Skipping code compliance creates liability and can void insurance claims after an incident.
What are the main types of security camera cables?
The cable type you choose sets the ceiling on your system’s performance. Each option has real trade-offs in distance, cost, and complexity.
Coaxial cables (RG59 and RG6)
Coaxial cables transmit video only; analog CCTV systems require separate power cables connected to power supplies or adapters. BNC connectors attach the coaxial cable to cameras and DVRs. RG59 is the standard choice for runs up to 750 feet. RG6 handles longer distances and resists signal loss better, making it the preferred option for large properties.
Ethernet cables (Cat5e and Cat6)
Cat5e and Cat6 cables carry both data and, with PoE technology, electrical power over a single run. PoE cameras connect to PoE switches or NVRs via standard Cat5e or Cat6 cables, eliminating the need for a separate power cable at each camera location. Cat6 supports higher bandwidth and is the better choice for 4K IP cameras or runs exceeding 200 feet.
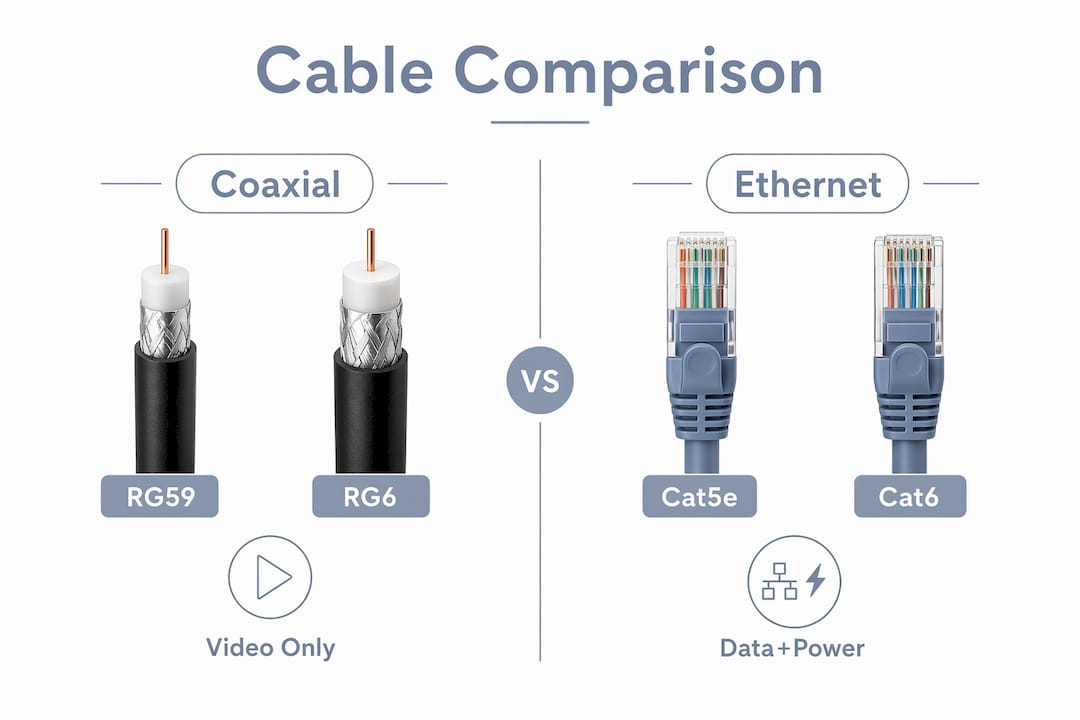
Cable comparison at a glance
| Cable type | Max reliable run | Power delivery | Typical use case |
|---|---|---|---|
| RG59 coaxial | 750 ft | Separate cable required | Analog CCTV, DVR systems |
| RG6 coaxial | 1,000+ ft | Separate cable required | Long-run analog, HD-over-coax |
| Cat5e Ethernet | 328 ft | PoE capable | IP cameras, NVR systems |
| Cat6 Ethernet | 328 ft | PoE+ capable | 4K IP cameras, high-bandwidth NVRs |
PoE technology simplifies installation significantly. One cable replaces two, which cuts labor time and reduces the number of potential failure points. For most new residential and commercial installs, Cat6 with PoE is the practical standard.
How do you plan cable routes for home and business installs?
Planning cable paths before you drill a single hole saves hours of rework. The goal is the shortest, most protected route from each camera to the recorder, with zero sharp bends and no contact with high-voltage electrical wiring.
Start by mapping camera locations on a floor plan. Mark the recorder location, then trace a path for each cable that avoids electrical panels, HVAC ducts, and areas where cables could be pinched by framing. Securing cables along studs with conduits or clips prevents damage and keeps the installation looking professional.
Outdoor runs require extra attention. Outdoor cables must be UV-rated and weatherproof; standard indoor cables degrade outdoors in roughly three years. Seal all exterior wall penetrations with silicone to block moisture and pests. Use conduit wherever the cable runs along an exposed exterior surface.
Key planning steps before you start pulling cable:
- Identify the recorder or NVR location first, then plan all cable routes back to it
- Use a stud finder and inspection camera to map wall cavities before drilling
- Keep low-voltage cables at least 12 inches away from high-voltage electrical wiring
- Plan for plenum-rated cable in any air-handling space or fire-rated ceiling
- Mark every cable at both ends with a label before installation
Pro Tip: Leave 12–18 inches of extra cable at each camera location as a service loop. This slack lets you re-terminate a connector without pulling new cable if a BNC or RJ45 connector corrodes or breaks later.
What are the step-by-step methods to wire security cameras?
The wiring process differs by camera technology. Follow the correct sequence for your system type to avoid rework.
Wiring analog cameras with coaxial cable
- Cut the RG59 or RG6 cable to length, adding 18 inches of slack at the camera end.
- Strip the outer jacket, fold back the braided shield, and expose the center conductor.
- Crimp or twist a BNC connector onto the cable end using a BNC crimp tool.
- Connect the BNC end to the camera’s video input.
- Run a separate 18 AWG power cable from the camera to a centralized power supply.
- Connect the power cable to the camera’s DC power jack.
- Terminate the other end of the coaxial cable at the DVR with a second BNC connector.
- Power on the system and verify live video on the DVR monitor.
Wiring IP cameras without PoE
- Run a Cat5e or Cat6 cable from the camera location to the NVR or network switch.
- Terminate both ends using the T568B wiring standard for consistent Ethernet performance.
- Crimp RJ45 connectors onto both ends and test continuity with a cable tester.
- Connect the camera end to the camera’s Ethernet port.
- Run a separate power cable or use a local power adapter at the camera.
- Connect the NVR end to the switch or NVR Ethernet port.
Wiring PoE cameras
- Run a single Cat5e or Cat6 cable from the camera to the PoE switch or PoE-capable NVR.
- Terminate both ends with RJ45 connectors using the T568B standard.
- Plug the camera end into the camera’s Ethernet port.
- Plug the NVR end into the PoE switch or NVR port.
- The switch delivers power and data over the same cable automatically.
Test all camera functions, including live video, motion alerts, and night vision, before mounting cameras permanently. Use a laptop or IP camera tester to verify each connection at the cable level before the camera goes on the wall.
What are the most common wiring mistakes and how do you avoid them?
The most critical mistake in any wiring project is skipping cable management. Cables that run loosely through walls or across ceilings get pinched, kinked, or chewed by pests. Poor cable management causes intermittent video loss that is extremely difficult to diagnose after the fact.
A second mistake is ignoring network security after installation. NVR default admin passwords are a serious vulnerability. Bots actively scan networks for devices running default credentials. Change every password to a strong, unique string during initial setup, not after the first incident.
Common mistakes to avoid on every install:
- Running outdoor-rated cable indoors without checking fire ratings
- Skipping the service loop at camera locations
- Using undersized staples that crush the cable jacket
- Mixing T568A and T568B terminations on the same run
- Mounting the NVR in a hot, unventilated space that shortens hardware life
Pro Tip: Place the NVR in a cool, ventilated, and physically secured location. Heat is the leading cause of NVR hardware failure, and an unsecured recorder defeats the purpose of the entire system.
Post-installation, run a full camera repair workflow check: confirm every camera shows live video, motion detection triggers correctly, and night vision activates at low light. Document cable routes and label every run for future maintenance.
Key Takeaways
Reliable security camera wiring requires the right cable type, a planned route, proper termination, and post-install testing before any camera is permanently mounted.
| Point | Details |
|---|---|
| Choose cable by system type | Use RG59/RG6 for analog systems and Cat5e/Cat6 for IP or PoE cameras. |
| PoE simplifies installation | A single Cat5e or Cat6 cable delivers both power and data to PoE cameras. |
| Plan routes before drilling | Map cable paths away from electrical wiring and use conduit for outdoor runs. |
| Leave service loops | Add 12–18 inches of slack at each camera location for future re-termination. |
| Secure the network | Change NVR default passwords immediately and test all camera functions before finalizing. |
What I’ve learned after years of wiring security cameras
The gap between a clean install and a frustrating one almost always comes down to two things: service loops and cable management. Every installer I’ve seen skip the service loop eventually regrets it. A corroded BNC connector six months after installation means re-running 80 feet of cable instead of just re-terminating the last 18 inches. That extra slack costs nothing and saves real money.
PoE cameras have genuinely changed how I approach most residential and small commercial jobs. One cable per camera, no separate power runs, no power supply boxes to hide. The simplicity is not just convenient. It reduces failure points, and fewer failure points mean fewer callbacks.
The part most DIY guides underplay is the network security side. Wiring the cameras correctly is only half the job. An NVR sitting on a home network with the factory password is a liability. I’ve seen systems accessed remotely by people who had no business watching that footage. Change the password on day one, every time.
My honest advice: read your local low-voltage installation codes before you start. Plenum ratings, conduit requirements, and cable separation rules exist for real reasons. A code-compliant install protects you legally and makes the system easier to service for whoever comes after you.
— Aaron
Lowvoltagecorp security camera installation support
Wiring a security camera system correctly takes planning, the right materials, and attention to detail that goes beyond what most general guides cover.

Lowvoltagecorp specializes in security camera installation, repair, and maintenance for homes and businesses across South Florida. Whether you need a full wiring plan for a new property or a repair on an existing system, the team brings hands-on low-voltage expertise to every job. Property managers can also review energy-efficient security tips to reduce operating costs while keeping coverage strong. For a complete picture of surveillance lighting and camera placement, the surveillance lighting guide is a practical next step.
FAQ
What is the best cable for security camera wiring?
Cat6 Ethernet cable is the best choice for most modern IP and PoE security camera systems. It supports higher bandwidth, handles runs up to 328 feet, and delivers both power and data when paired with a PoE switch.
Can I wire a security camera myself without an electrician?
Residential PoE security camera wiring rarely requires a licensed electrician, but installations in fire-rated areas must use plenum-rated cable and comply with local building codes.
How far can security camera cable run?
Cat5e and Cat6 Ethernet cables reliably carry PoE signals up to 328 feet. RG59 coaxial cable handles analog video up to 750 feet, and RG6 extends that range beyond 1,000 feet.
What does a security camera wiring diagram show?
A security camera wiring diagram maps the cable path from each camera to the DVR or NVR, showing cable type, connector types, power source locations, and any switches or PoE injectors in the signal path.
How long do security cameras retain video footage?
Most systems are configured to retain footage for 14–30 days, depending on storage capacity and recording resolution. Higher-resolution cameras fill storage faster and may require larger hard drives or cloud backup.