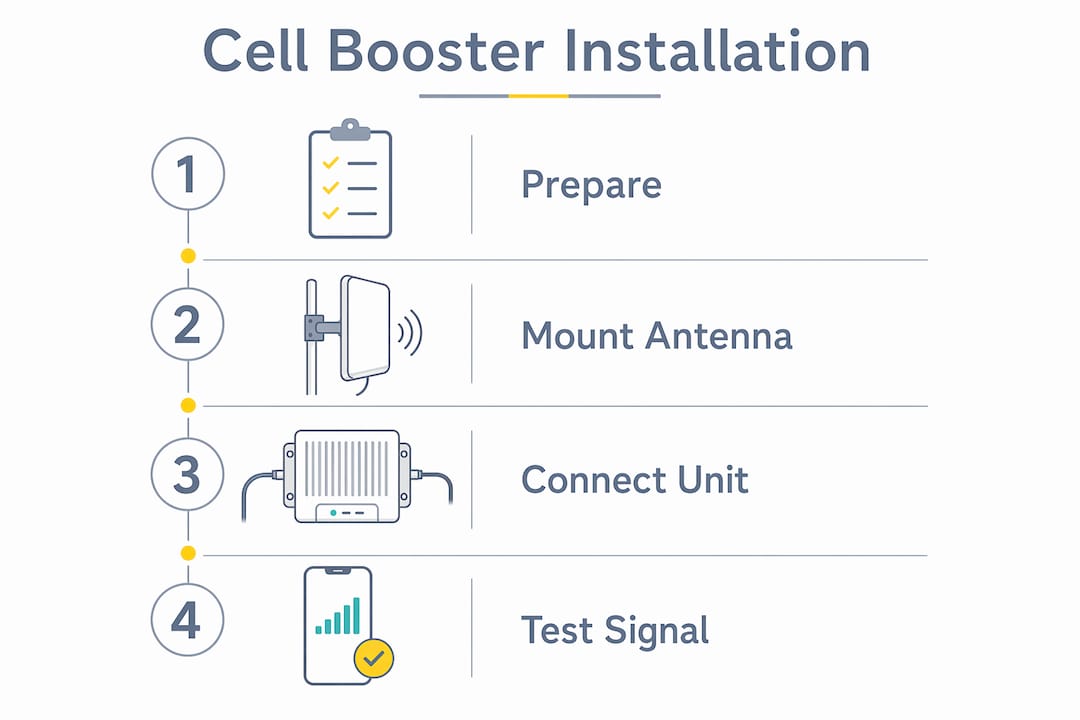
A cell phone signal booster is defined as a device that captures an existing outdoor cellular signal, amplifies it, and rebroadcasts it inside your home. A proper step by step cell booster install requires four things done right: a strong donor signal outside, correctly placed antennas, a well-connected booster unit, and fine-tuning after power-up. Skip any of those steps and you will get a system that underperforms or causes feedback oscillation. Lowvoltagecorp has seen this pattern repeat in hundreds of residential installs. The good news is that with the right process, a homeowner with basic DIY skills can do this in an afternoon.
What do you need before starting a cell booster install?
Preparation separates a clean install from a frustrating one. Gather every component before you touch a wall or climb on a roof.
Essential equipment
| Component | Purpose |
|---|---|
| Outdoor donor antenna | Captures signal from the cell tower |
| Indoor rebroadcast antenna | Distributes amplified signal inside |
| Booster/amplifier unit | Amplifies the signal between antennas |
| Coaxial cable (RG6 or LMR-400) | Connects antennas to the booster |
| Mounting hardware | Secures antennas to roof, wall, or mast |
| Power adapter | Powers the booster unit |
For longer cable runs, LMR-400 is the right choice. Low-loss cable like LMR-400 minimizes signal degradation and improves overall system reliability compared to standard RG6.
Tools you need on hand
- Drill with masonry or wood bits
- Screwdriver set
- Coaxial cable stripper and crimper
- Signal meter or a smartphone with a field test mode app
- Cable staples or clips for routing
- Weatherproof sealant for outdoor penetrations
Site assessment before you drill anything
Walk the outside of your home with your phone in field test mode. Field test mode shows raw signal in dBm rather than bars, which gives you an actual number to work with. Find the spot where the reading is highest. That is where your outdoor antenna goes. Also check for any FCC registration requirements for your booster model. Most consumer-grade boosters sold in the United States are FCC-certified and do not require a separate permit, but confirming this takes two minutes and avoids problems later.
Pro Tip: Download a free field test app before your install day. Knowing your baseline dBm reading lets you confirm real improvement after the system is running.
How do you find and mount the outdoor antenna?
The outdoor donor antenna location is the single most critical factor in your entire system’s success. Elevating the antenna as high as possible and keeping it away from metal obstructions maximizes the signal it captures. A poorly placed outdoor antenna cannot be compensated for by a powerful booster unit.
Choosing the right antenna type
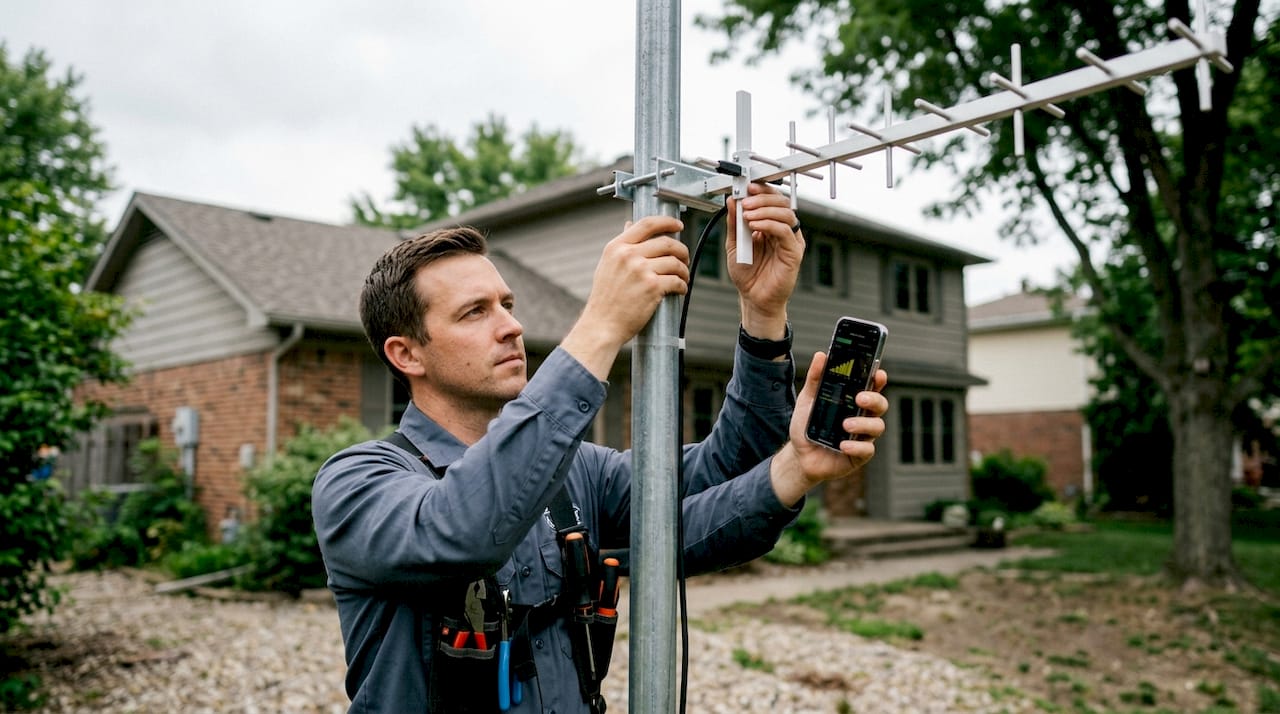
Directional Yagi or panel antennas work best when you know which direction the nearest cell tower sits. They focus gain in one direction and reject interference from other directions. Omni antennas work better when you need to pull signal from multiple towers or when tower direction is unclear. For most suburban homes with a known carrier tower, a directional Yagi is the stronger choice.
Step-by-step outdoor antenna mounting
- Mark your chosen mounting location on the roof edge, gable, or exterior wall. Confirm it is the highest practical point with the cleanest line of sight toward the tower.
- Attach the mounting bracket to the surface using lag screws for wood or masonry anchors for brick. Pull firmly to confirm it does not move.
- Slide the antenna onto the mast and loosely tighten the clamp. Do not fully lock it yet.
- Connect your coaxial cable to the antenna’s port. Hand-tighten only. Apply weatherproof tape over the connection.
- Point the antenna roughly toward the tower using a compass or a carrier coverage map.
- Have a helper watch the signal meter indoors while you rotate the antenna in one-quarter turn increments. Stop at the position with the highest reading.
- Lock the antenna clamp fully once the best position is confirmed.
- Seal any roof or wall penetrations with weatherproof sealant before routing the cable inside.
Pro Tip: Do the fine-tuning rotation before you seal cable penetrations. Adjusting antenna direction after the cable is locked in place is far harder.
How do you connect the booster unit and indoor antenna?
Routing cable and connecting the booster correctly prevents the two most common problems: signal loss from poor connections and oscillation from antennas that are too close together.
Running the coaxial cable indoors
- Route cable along baseboards, through interior walls, or down a utility chase. Avoid sharp bends tighter than a fist-width radius. Sharp bends crush the cable’s center conductor and kill signal.
- Use cable clips or staples every 18–24 inches to keep the run tidy and prevent tension on connectors.
- Never run coax parallel to electrical wiring for long distances. Cross at 90-degree angles when paths must intersect.
- Avoid stacking multiple adapters in the cable run. Extra adapters add failure points, increase moisture ingress risk, and degrade signal. Use the correct connector type for your booster and antenna from the start.
Placing the booster unit
Keep the booster in a dry, cool, and ventilated spot inside the home. A utility closet, basement shelf, or wall-mounted bracket near the cable entry point all work well. The unit needs airflow around it to prevent overheating. Leave at least four inches of clearance on all sides.
Antenna separation: the rule that matters most
Maintain at least 7–10 meters of horizontal separation between the outdoor and indoor antennas. That translates to roughly 23–33 feet. Walls and floors between the two antennas count as shielding and help prevent oscillation. Vertical separation of 50 feet, such as an outdoor antenna on the roof and an indoor antenna on the ground floor, is often more effective than horizontal separation alone.
Mounting the indoor antenna
Place the indoor antenna in the room where you use your phone most. A ceiling mount in the center of that room gives the widest coverage footprint. Connect the coax from the booster’s output port to the indoor antenna. Hand-tighten all connectors. Overtightening coaxial connections damages the internal threads and can crack the connector body, which creates an intermittent fault that is hard to diagnose later.
Pro Tip: If your home has two floors, mount the indoor antenna on the ceiling of the first floor pointing upward. This pushes signal through the floor into the second floor and covers both levels from one antenna.
How do you power up and test your cell booster system?
Testing is not optional. It confirms the install worked and catches problems before you put tools away.
Power-up sequence
- Plug in the booster unit and wait 30 seconds for it to initialize.
- Check the status indicator lights. A solid green light on most units means the system is operating normally. A red or flashing light signals oscillation or a connection fault.
- If you see an oscillation warning, increase the physical separation between antennas or add a floor between them as a barrier.
- Walk through the home with your phone in field test mode and note the dBm reading in each room. Compare these to your baseline readings from before the install.
- Return to the outdoor antenna and make small directional adjustments if indoor readings are lower than expected. Testing with a signal meter during this phase confirms real improvement and guides final tuning.
Reading signal quality, not just signal strength
Signal-to-Interference-plus-Noise Ratio, known as SINR, matters more than raw signal strength. A strong but noisy signal reduces data speeds even when the bar count looks good. Prioritize a clean SINR reading over chasing the highest dBm number.
SINR quality is the metric that predicts real-world call quality and data speeds. If your booster is pulling in a strong but interference-heavy signal, your speeds will still disappoint. This is why donor antenna placement matters so much. A clean signal at the outdoor antenna produces a clean amplified signal indoors.
Common mistakes to fix before you finish
- Overtightened connectors that cracked during install. Replace any connector that feels rough when threading.
- Adapters stacked at the booster ports. Remove them and use a single correct connector.
- Indoor antenna pointed at a concrete or brick wall rather than into open living space. Reposition it to face the room.
- Outdoor antenna aimed at a metal roof section or HVAC unit. Relocate or raise the antenna to clear the obstruction.
For a deeper look at what goes wrong after install, the cell booster troubleshooting guide from Lowvoltagecorp covers the most common faults and how to fix them fast.
Key Takeaways
A successful cell booster install depends on outdoor antenna placement above all else. Every other step builds on the quality of the donor signal you capture outside.
| Point | Details |
|---|---|
| Outdoor antenna placement | Mount as high as possible, away from metal, and aimed at the nearest tower. |
| Antenna separation | Keep at least 23–33 feet horizontal distance between outdoor and indoor antennas. |
| Cable quality matters | Use LMR-400 for long runs and avoid stacking adapters to prevent signal loss. |
| Hand-tighten all connectors | Overtightening cracks connectors and creates faults that are hard to trace later. |
| Test with SINR, not just bars | A clean signal reading predicts real call quality better than raw dBm strength. |
What I have learned from doing these installs
The mistake I see most often is homeowners spending money on a powerful booster unit when the real problem is a weak or noisy donor signal outside. A booster amplifies what it receives. If the outdoor signal is poor, the booster just amplifies noise louder. The cell booster advantages only show up when the donor signal is clean.
My strongest advice: measure your baseline dBm and SINR before you buy anything. If your outdoor reading is below a usable threshold, no booster will save you. You need a better antenna position first.
The second thing I see go wrong is impatience during the fine-tuning step. People lock the outdoor antenna in the first position that shows any improvement and call it done. Spending an extra 10 minutes rotating in quarter-turn increments often yields a meaningful gain. That gain compounds through the whole system.
Finally, keep the cable run clean. Every adapter, every sharp bend, and every foot of low-quality coax eats into the gain your booster produces. A shorter, cleaner cable run with LMR-400 beats a long run of RG6 with three adapters every time. The install is only as good as its weakest connection.
— Aaron
Lowvoltagecorp can help with your booster setup
Lowvoltagecorp specializes in residential low-voltage installations, including cell booster systems for homeowners across South Florida. Whether you need professional-grade equipment advice or want a licensed technician to handle the install, Lowvoltagecorp has the experience to get it right the first time.
The team at Lowvoltagecorp also publishes detailed guides built around real install experience. The South Florida installation tips page covers region-specific considerations like concrete block construction and coastal interference that affect booster performance. For homeowners who also want to address security, lighting, or network infrastructure at the same time, the cost-saving security upgrades page outlines how to bundle low-voltage work efficiently.
FAQ
What is the minimum antenna separation for a cell booster?
The industry standard is 7–10 meters of horizontal separation between the outdoor and indoor antennas. Vertical separation of 50 feet, such as a rooftop outdoor antenna above a ground-floor indoor antenna, is often more effective.
Can I install a cell booster myself without a license?
Most FCC-certified consumer cell boosters sold in the United States are legal for homeowner DIY installation without a license. Check your specific model’s FCC certification label before installing.
Why does my booster show a red light after powering on?
A red or flashing indicator light typically signals oscillation, meaning the indoor and outdoor antennas are too close together. Increase their separation or add a floor between them as a barrier.
What cable type works best for a cell booster install?
LMR-400 is the best choice for runs longer than 20 feet. It carries significantly less signal loss per foot than standard RG6 and improves overall system performance.
How do I know if my cell booster is actually working?
Put your phone in field test mode before and after the install and compare the dBm readings room by room. A working system will show a measurable improvement in both signal strength and SINR quality indoors.