A point-to-point WiFi bridge is a pair of directional outdoor radios that link two networks without trenching a single foot of cable. It’s the right call when you need reliable connectivity between nearby buildings and you have mostly clear line-of-sight between them. If trees, hills, or other rooflines block that path, wireless point to point stops being the easy option.
TL;DR:
- Line-of-sight clarity is crucial; obstructions like trees, hills, or buildings can reduce effective range from half a mile or more to just a few hundred feet.
- 2.4 GHz radios offer better obstacle penetration and longer range, while 5 GHz provides higher throughput in clear conditions but shorter reach.
- Consumer kits are typically limited to 100 Mbps wired port speeds, whereas prosumer and enterprise gear can support multi-gigabit throughput with appropriate interfaces.
- Proper grounding, secure mounting, and measuring SNR during installation are essential to ensure reliability and prevent costly troubleshooting later.
- Operating unlicensed spectrum gear in the US requires adherence to FCC power limits and possibly AFC registration for 6 GHz devices, especially near property lines or public rights-of-way.
Table of Contents
- How Point to Point WiFi Works: Antennas, Modes, and Signal Flow
- How Far Can a Point-to-Point WiFi Link Reach?
- Choosing Equipment: Frequency, Throughput, and Port Limits
- Step-by-Step Point to Point WiFi Installation Checklist
- What Speed and Latency Should You Actually Expect?
- Common Uses: Camera Backhaul, Remote Access Points, and Gate Controls
- Troubleshooting a Point to Point WiFi Link
- An Installer’s Workflow: What Aaron Checks Before Flipping the Link On
- Regulatory Rules You Need to Know Before Installing
- Wireless Bridge, Trenched Cable, or Cellular: Which Actually Wins?
- Get a Professional Point-to-Point WiFi Installation
- Sources
- FAQ
How Point to Point WiFi Works: Antennas, Modes, and Signal Flow
A point-to-point wireless link uses two directional antennas aimed at each other, each concentrating radio energy into a narrow beam instead of spraying it in every direction like a household router. That focus is what lets a signal travel a half mile or more instead of fading out at the edge of a backyard.
Each radio gets configured into a specific role. One typically runs in “access point” or “base” mode, and the other in “station” or “client” mode. Some devices support a dedicated PtP bridge mode that locks the pair together and ignores other traffic:
- Access point/base mode: the radio that other devices (or the paired unit) connect to.
- Station/client mode: the radio that initiates the connection to the base.
- Bridge mode: makes the wireless hop invisible to the network, so devices on both ends behave as if they’re on one switch.
- Beamwidth: narrower beams (5 to 15 degrees) carry farther but demand more careful aiming than wide-beam consumer gear.
Most residential and small-business installs run in transparent bridge mode. That means the link doesn’t route or assign new subnets. It just extends the existing LAN across the gap, so a camera or laptop on the far side gets an IP address from the same DHCP server as everything else.
How Far Can a Point-to-Point WiFi Link Reach?
Distance depends far more on obstructions than on marketing specs. A clean, unobstructed path between two rooftops can easily support half a mile to a mile with consumer-grade gear, and specialized long-range kits push well past that. Put a tree line, a hill, or a neighboring building in the path, and the same equipment might struggle at a few hundred feet.
Frequency choice shifts that math. Field testing on inexpensive outdoor kits found that 2.4 GHz radios tolerate light vegetation and obstruction better than 5 GHz, while 5 GHz often delivers more usable throughput once the path is genuinely clear. That tradeoff runs through the entire category:
- 2.4 GHz: longer effective range, better penetration through leaves and light obstacles, more crowded spectrum.
- 5 GHz: higher throughput in clean line-of-sight, shorter effective range, less crowded than 2.4 GHz in most areas.
- 6 GHz: even cleaner spectrum with less interference from neighboring WiFi networks, though adoption in outdoor PtP gear is newer.
- 60 GHz: very high throughput over short hops, but extremely sensitive to rain, fog, and anything blocking the beam.
Pro Tip: Walk the actual path between your two mounting points at both ends of the day. Morning shadows and afternoon sun reveal branches and sightline issues that a satellite map completely hides.
A rough heuristic worth remembering: every doubling of distance costs you roughly 6 dB of signal budget, which is why halving the distance to a link often matters more than doubling the antenna gain.
Choosing Equipment: Frequency, Throughput, and Port Limits
Point-to-point kits fall into a handful of clear categories, and matching your budget to your actual distance and traffic needs saves you from overbuying gear that a wired Ethernet port will bottleneck anyway.
- Consumer outdoor CPEs (Wi-Fi 4/5): inexpensive, reliable at short range through light obstruction, but often capped at around 100 Mbps by their wired Ethernet port even when the radio link itself is faster.
- Prosumer Wi-Fi 6/7 PtP kits: newer kits like the Omada Beam Bridge 7 advertise multi-gigabit wireless throughput within roughly a kilometer using 5 GHz and 6 GHz multi-link operation, paired with 2.5G or SFP+ ports so the wired side doesn’t choke the wireless side.
- 60 GHz short-distance links: units like the MikroTik Wireless Wire nRAY claim near-fiber speeds over a few hundred meters up to roughly 1,500 meters in clear conditions, sold pre-paired for plug-and-play setup.
- Enterprise backhaul: 5 Gbps-class systems built for long-range, mission-critical links, with 10 GbE or SFP+ interfaces, TDMA scheduling for predictable latency, and industrial weatherproofing.
Powering matters just as much as radio choice. Most consumer kits ship with a passive PoE injector, while prosumer and enterprise gear increasingly expects standard 802.3af or 802.3at PoE from a switch. Check that your PoE budget actually covers the draw of both radios before you commit to a cable run, and confirm any 6 GHz gear you buy meets current outdoor weatherproofing and surge protection standards if it’s going on an exposed roof or pole.
Step-by-Step Point to Point WiFi Installation Checklist
Installing a point to point wifi bridge rewards patience far more than raw horsepower. Rushing the survey step is the single most common reason a link underperforms for months after it goes live.
- Survey the site. Photograph both mounting points, measure the actual distance, and note anything that could block the path: trees, roof overhangs, future construction.
- Mount the hardware. Choose pole or wall mounts based on what’s already there, get enough elevation to clear obstacles, and tighten hardware to withstand wind, not just gravity.
- Run power and network cable. Decide between a PoE injector at each end or a PoE switch feeding the run, and protect any exposed cable with conduit rated for outdoor use.
- Aim and fine-tune. Do a coarse aim by eye first, then watch the signal-to-noise ratio (SNR) readout on the device’s interface and nudge each antenna in small increments until SNR peaks.
- Configure the network. Set one radio to access point/bridge role and the other to station, assign static IPs on both ends if your network uses them, and use a bridge-only SSID that isn’t broadcast for general client use.
- Secure the link. Turn on WPA2 or WPA3 encryption at minimum. An unsecured PtP link is an open door onto your entire network from anyone within antenna range.
- Commission and test. Run a real speed test across the link, log the SNR reading, and write both numbers down somewhere you’ll find them again during a future troubleshooting call.
Pro Tip: Buy a spare PoE injector and a length of outdoor-rated Cat6 before the install, not after. A dead injector on a Saturday afternoon is the most avoidable service call in this entire trade.
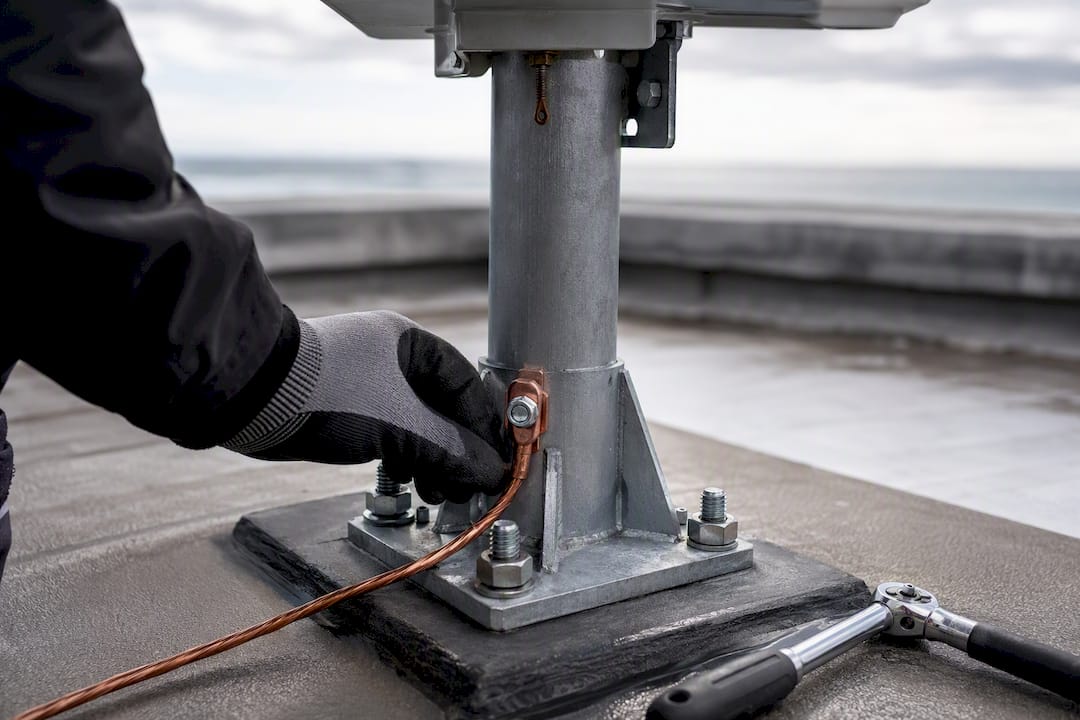
Grounding deserves its own line item, not an afterthought. Any radio mounted outdoors on a pole or roof mast needs a proper grounding path to protect it, and everything downstream of it, from a nearby lightning strike.
What Speed and Latency Should You Actually Expect?
Here’s the gap almost nobody warns you about: your $60 outdoor radio might genuinely support 150 Mbps over the air, and you’ll still only see about 100 Mbps end to end because that’s all its single Ethernet port can pass. The radio was never your bottleneck. The port was.
- Consumer bridges: expect wired-port-limited throughput, commonly 100 Mbps, regardless of what the radio spec sheet claims.
- Prosumer and enterprise kits: multi-gig wired interfaces let the wireless link’s actual capacity show up on a speed test.
- Latency and jitter: a well-aligned link typically adds only a few milliseconds, fine for VoIP and live camera feeds, but misalignment or interference introduces retransmissions that spike jitter unpredictably.
- Every added dB of interference or every degree of misalignment chips away at throughput before you ever notice a dropped connection.
Distance and obstruction do the same damage gradually. A link that tested at 90 Mbps on installation day can quietly slide to 40 Mbps six months later purely from a tree that grew four feet.
Common Uses: Camera Backhaul, Remote Access Points, and Gate Controls
Most property owners reach for a point-to-point wireless bridge for one of two jobs: extending network access to a detached building, or getting security camera footage back to a recorder without trenching cable across a parking lot.
- Remote AP or mesh node backhaul: feed a WiFi access point in a second building or a warehouse corner where running cable isn’t practical.
- Camera backhaul: connect cameras on a detached garage, gate, or remote parking structure back to your main network video recorder.
- Gate controller integration: give an automated gate a reliable network path for status monitoring and remote access without a dedicated cable trench.
- VLAN segmentation: put bridged devices on their own VLAN so a compromised remote camera or gate controller can’t reach your core business network.
The same architecture that saves you a trenching bill also isolates the risk. A remote device connected wirelessly should never sit on the same broadcast domain as your point-of-sale system or office file server.
Troubleshooting a Point to Point WiFi Link
Most PtP problems trace back to one of three causes: alignment drift, interference, or a change in the physical path. A quick SNR and throughput test tells you which one you’re dealing with within a couple of minutes.
- Low SNR with steady throughput: check for new interference sources nearby, including new WiFi networks or expanded 2.4 GHz congestion.
- Low SNR with degraded throughput: suspect physical misalignment, often from wind or a mounting bracket that’s loosened over time.
- Good SNR with poor throughput: check for a duplex mismatch, a wrong channel width setting, or an incorrect distance parameter in the radio’s configuration.
Pro Tip: Log SNR and speed test results every time you touch the link, even for routine maintenance. A slow decline over months is invisible without a baseline to compare against.
Seasonal upkeep matters more than most people expect. Trim vegetation before it fully leafs out each spring, check mounting hardware after any major storm, and keep firmware current, since manufacturers regularly patch stability issues that show up as intermittent link drops.
An Installer’s Workflow: What Aaron Checks Before Flipping the Link On
Aaron, a low-voltage electrician who installs these links regularly, runs the same short checklist on every job before touching a mounting bracket. Skipping any one of these steps is where most callbacks come from.
- Photograph both mounting locations and the path between them before ordering hardware, so mount choice matches the actual roofline and structure.
- Confirm the power plan: where the PoE source lives, how the cable run gets protected, and whether a permit applies to the mounting structure.
- Test cables before committing them to a conduit run. A bad connector discovered after the wall is closed up costs three times as much to fix.
- Do a coarse aim first, check throughput, then fine-tune in small increments while watching SNR, not signal bars.
- Never skip grounding, and never let anyone climb a ladder alone on a windy day. If a job needs licensed electrical work beyond low-voltage data and PoE, that’s the point to bring in a licensed contractor.
A documented installer workflow that captures SNR and speed numbers at commissioning turns a future troubleshooting call from a guessing game into a five-minute comparison against baseline.
Regulatory Rules You Need to Know Before Installing
Most point-to-point WiFi gear in the United States operates in unlicensed spectrum, meaning you don’t need an FCC license to run a standard 2.4 GHz, 5 GHz, or 6 GHz consumer or prosumer bridge on your own property. That’s a real advantage over licensed microwave backhaul, which requires spectrum coordination and ongoing fees.
Unlicensed doesn’t mean unregulated. The FCC caps transmit power and antenna gain combinations differently across the UNII bands used by 5 GHz and 6 GHz equipment, and those limits vary by specific frequency range within each band. High-gain directional antennas paired with certain radios can exceed legal effective radiated power if you’re not careful, particularly on longer-range 5 GHz links using external antennas rather than integrated ones.
Some newer 6 GHz devices also rely on an Automated Frequency Coordination system to determine safe operating power near other licensed users of that spectrum, a mechanism built into the setup process for compliant 6 GHz gear. If your kit requires AFC registration, you cannot legally operate it at full power until that step completes.
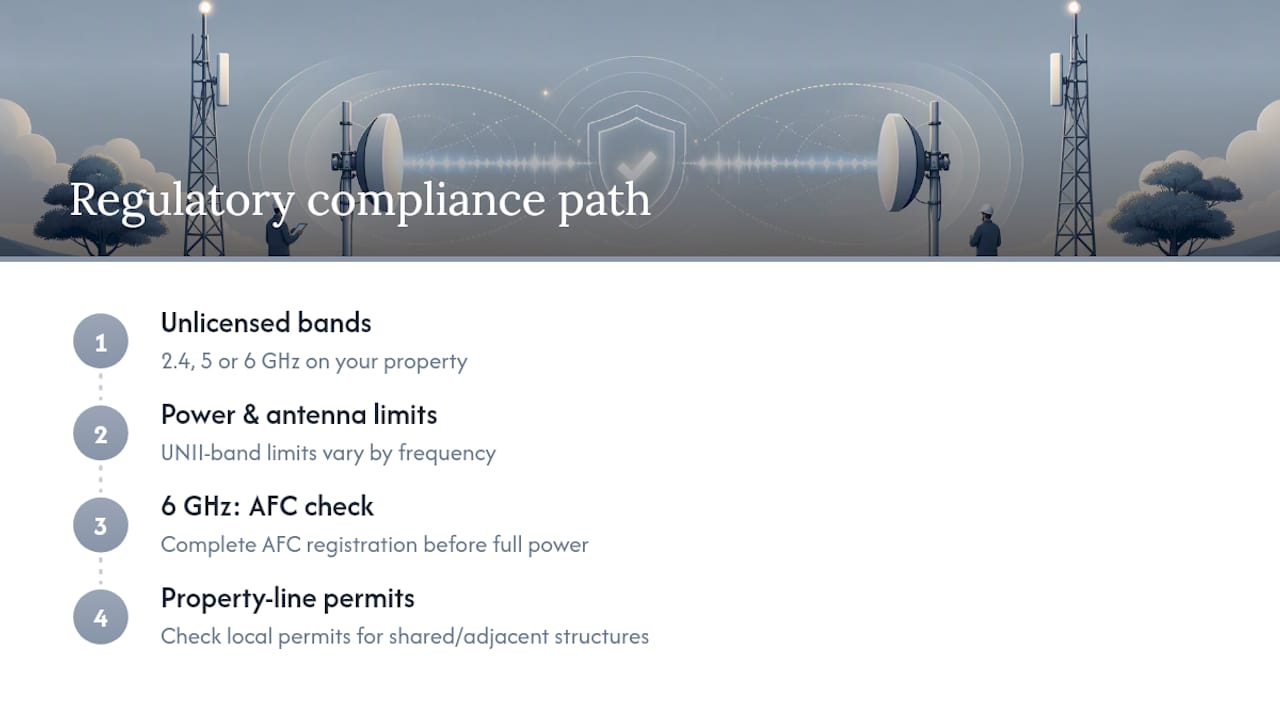
Property line matters too. A point-to-point wireless link crossing over a public right-of-way, a road, or another property owner’s land can trigger local permitting requirements even though the radios themselves are unlicensed. Before mounting anything on a shared roof or a structure near a property boundary, check municipal rules. Consumer marketing rarely mentions any of this, which is exactly why it trips up otherwise careful DIY installers.
Wireless Bridge, Trenched Cable, or Cellular: Which Actually Wins?
Wireless point to point wins on cost and speed of deployment, but it demands ongoing line-of-sight maintenance that trenched fiber or Ethernet never will. Trenching costs more upfront and takes longer, yet it delivers the most reliable long-term connection with essentially zero weather dependency. Cellular backup fits low-data or short-term needs, not a permanent primary link.
— Aaron
Get a Professional Point-to-Point WiFi Installation
If you’ve read through the alignment steps, SNR thresholds, and grounding requirements above and you’re already picturing the ladder rental, there’s a simpler path: Professional installers handle the entire job, from the initial site survey to final commissioning, so the link works correctly the first time instead of the third.

Crews handle the site survey, professional mounting and grounding, PoE cabling and termination, and full testing and documentation before they leave the property, the same checklist Aaron runs on every job. If you’re comparing quotes from other contractors first, ask three questions: what’s their warranty on the install, are they insured for rooftop and ladder work, and can they show you a similar link they’ve installed nearby. Those three answers separate a real installer from someone who just sells hardware.
A properly documented PtP link pairs well with other low-voltage work on the same property, whether that’s wiring a security camera system that needs backhaul from a remote building or extending reliable wired network infrastructure to a structure that never had it. Contact a professional low voltage service provider to schedule a site survey and get a straight quote on what your specific distance and building layout actually requires.
Sources
For hands-on performance numbers on budget bridge kits, the Ars Technica field test on point-to-point WiFi bridging remains one of the most detailed independent breakdowns available. Vendor spec pages for kits like Omada’s Beam Bridge 7 are useful for comparing throughput claims, but always double check FCC power and UNII band rules for your specific 5 GHz or 6 GHz equipment before installing.
- Point-to-point Wi-Fi bridging between buildings—the cheap and easy way – Ars Technica
- Beam Bridge 7 KIT | Omada Wi-Fi 7 5 GHz & 6 GHz MLO PtP Wireless Bridge | Omada by TP-Link
- High-Capacity Point to Point Wireless Link | GNS WIRELESS
- LigoPTP RapidFire 6 – 6GHz Outdoor Wireless PTP Bridge | LigoWave
FAQ
What Is a Point-to-Point WiFi Network?
A point-to-point WiFi network is a pair of directional radios that connect two fixed locations wirelessly, typically to extend a network between two buildings without running cable.
How Far Can Point-to-Point WiFi Reach?
With clear line-of-sight, consumer-grade kits commonly reach half a mile to a mile, while specialized long-range or enterprise gear extends well beyond that; obstructions like trees and buildings shrink usable range significantly.
How Does Point-to-Point WiFi Work?
Two directional antennas, one set as an access point and one as a station or client, aim at each other and form a dedicated wireless link, which typically operates as a transparent bridge extending the existing LAN across the gap.
How Do I Install a Point-to-Point WiFi Bridge?
Survey the site and measure the actual distance, mount both radios securely, run power over a PoE injector or switch, aim each antenna while watching the SNR reading, then configure roles, security, and a bridge-only SSID before testing throughput.
Does Point-to-Point WiFi Need an FCC License?
Standard 2.4 GHz, 5 GHz, and 6 GHz point-to-point WiFi equipment operates in unlicensed spectrum in the United States, but transmit power limits still apply and some 6 GHz gear requires Automated Frequency Coordination before running at full power.