A cell signal booster, also called a cellular repeater or distributed antenna system, captures weak outdoor signal, amplifies it, and rebroadcasts it indoors. The right cell booster installation tips make the difference between a system that works and one that shuts itself down within minutes. South Florida homes face specific challenges: concrete block construction, hurricane-impact glass, and dense tropical foliage all block cellular signals more aggressively than wood-frame homes in other regions. Getting the setup right the first time saves you from costly reinstalls and frustrating dead zones.
1. Find the strongest outdoor signal location first
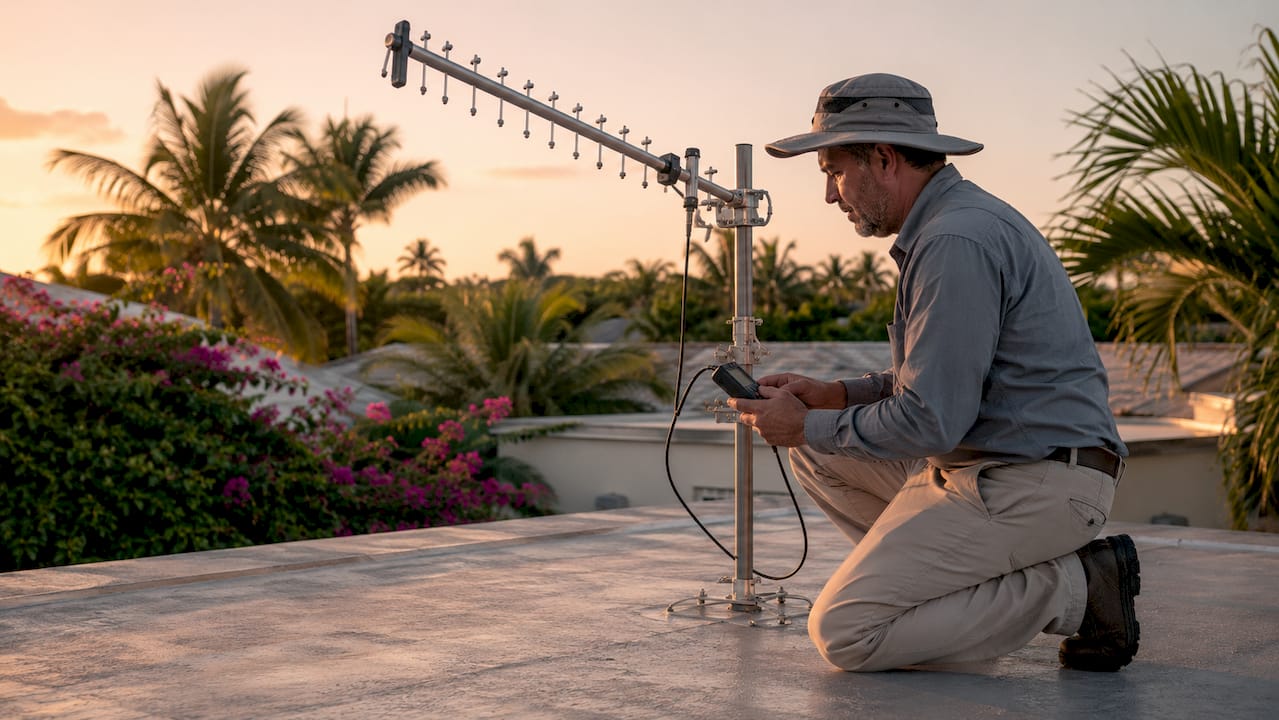
The outdoor antenna location is the single most important decision in the entire cell booster setup process. A booster can only amplify what it receives. If the donor signal is weak, the amplified indoor signal will still be poor.
Use your smartphone’s field test mode or a free app like OpenSignal to read raw signal strength in dBm rather than bars. Signal bars are averaged and rounded. A dBm reading gives you the exact number you need to compare spots. Walk the perimeter of your roof or upper floor and note readings at each corner.
- Open field test mode on your phone (dial 3001#12345# on iPhone or use a network app on Android).
- Record the dBm reading at each potential antenna location.
- Choose the spot with the highest number closest to zero (for example, -75 dBm beats -95 dBm).
- Confirm the spot has a clear view toward the nearest cell tower with no large trees or buildings blocking the path.
Placing the outdoor antenna on a roof or high pole with a clear line of sight to the nearest cell tower significantly improves reception. Higher elevation removes obstructions that absorb or scatter the signal before it reaches your antenna.
Pro Tip: Aim a directional Yagi antenna in quarter-turn increments while watching your dBm reading. Stop when the number peaks. This targets signal quality, not just raw power, which translates directly to faster data speeds.
2. Understand antenna separation to prevent shutdown
Oscillation from improper antenna proximity is the most common reason a booster shuts down after brief operation. The booster detects its own amplified signal looping back through the outdoor antenna and cuts power to protect the cellular network.
The fix is physical distance between your outdoor and indoor antennas. Industry best practices require a minimum of 20 feet of vertical separation or 50 feet of horizontal separation between the two antennas. In a typical South Florida single-story concrete block home, 20 feet of vertical separation is rarely achievable. That means you need to plan for 50 feet of horizontal distance instead.
Key separation rules to follow:
- Mount the outdoor antenna on the roof, pointing toward the cell tower.
- Place the indoor antenna on the opposite side of the home, pointing downward or toward the interior.
- Never mount both antennas on the same wall or ceiling plane.
- In apartments, use a window-mounted outdoor antenna and route the indoor antenna to a room on the far side of the unit.
| Scenario | Separation needed |
|---|---|
| Outdoor on roof, indoor on first floor | 20 feet vertical |
| Both antennas on same floor | 50 feet horizontal |
| Apartment with no roof access | 50 feet horizontal minimum |
| Two-story home | Outdoor on roof, indoor on ground floor |
Pro Tip: If your booster keeps shutting down after a few minutes, oscillation is almost always the cause. Move the indoor antenna further away before adjusting any settings.
3. Choose and run your coaxial cable correctly
Cable quality directly determines how much signal reaches your booster and indoor antenna. Every foot of coaxial cable loses a small amount of signal. Cheap or long cable runs can erase the gain your booster provides before the signal ever reaches your phone.
Use the shortest possible high-quality coaxial cable runs to reduce signal attenuation and improve booster performance. RG-6 works well for short runs inside a home. LMR-400 is the better choice for longer building runs because it loses less signal per foot. Plan your cable path before you buy. Measure the actual route, not a straight-line estimate.
Best practices for cable connections:
- Hand-tighten all coaxial connectors only. Over-tightening with pliers cracks the connector and creates a failure point.
- Avoid stacking adapters. Each adapter adds signal loss and a new place for the connection to fail.
- Weatherproof every outdoor connection with self-amalgamating tape or a weatherproof boot. South Florida humidity and rain will corrode an unprotected connector within months.
- Route cable through walls or conduit rather than running it across floors where foot traffic can damage it.
Avoiding stacked adapters preserves gain and reduces points of failure. This is a step most DIY installers skip, and it costs them performance they paid for.
4. Place the indoor antenna where you actually use your phone
The indoor antenna needs to cover the rooms where you spend the most time, not just the room closest to the booster. Most South Florida homeowners spend the majority of their indoor time in the living room, kitchen, or home office. That is where the indoor antenna belongs.
Indoor antennas must be placed in weak signal areas at least 18 inches from the booster unit, with a maximum of 36 inches for most residential kits. Placing the antenna too close to the booster causes the same oscillation problem as placing it too close to the outdoor antenna.
Choose the right antenna type for your space:
- Ceiling dome antenna: Best for open floor plans. Broadcasts signal in all directions below the ceiling. Ideal for living rooms and open kitchens.
- Panel antenna: Directional. Points signal toward one specific area. Best for long hallways, home offices, or rooms with thick concrete walls.
- Omni-directional antenna: Similar to the dome but designed for wall mounting. Good for apartments where ceiling mounting is not permitted.
Building materials matter in South Florida. Concrete block walls, stucco, and impact-rated glass all reduce signal propagation inside the home. A panel antenna pointed directly through a concrete wall will outperform a dome antenna mounted in the wrong room.
5. Align your outdoor antenna for signal quality, not just strength
Most installers point the outdoor antenna toward the nearest tower and stop there. That approach misses a critical step. Directional antenna aiming in quarter-turn increments refines signal quality and data speeds by improving SINR, which stands for Signal to Interference plus Noise Ratio.
SINR measures how clean the signal is, not just how strong it is. A strong but noisy signal produces slower data speeds and more dropped calls than a slightly weaker but clean signal. Sweep your Yagi antenna slowly across a 90-degree arc while watching your dBm reading and your data speed test results. The best position is where both numbers peak together.
This step takes an extra 10 minutes on the roof. It routinely produces noticeably better results than a quick point-and-mount approach.
6. Gather the right tools before you start
Most cell phone signal booster kits are designed for self-installation with basic tools. Showing up on the roof without the right equipment wastes time and creates safety risks.
Tools you need for a standard residential cell booster installation:
- Ladder tall enough to reach your roof safely
- Phillips-head screwdriver and adjustable wrench
- Smartphone with OpenSignal or field test mode active
- Drill with masonry bit for concrete block homes
- Self-amalgamating weatherproof tape
- Cable staples or conduit clips for routing cable
South Florida roofs are hot. Schedule your outdoor work for early morning before the heat peaks. Bring water and wear rubber-soled shoes on tile or metal roofing.
7. Troubleshoot common problems before calling for help
Common mistakes causing poor booster performance include insufficient antenna separation, poor cable connections, and incorrect antenna orientation. Most of these problems have a clear fix you can handle yourself.
- Booster shuts down after a few minutes. Oscillation is the cause. Increase the distance between your outdoor and indoor antennas. Move the indoor antenna to a room further from the outdoor antenna location.
- Signal improved but data speeds are still slow. Realign the outdoor antenna in quarter-turn increments. You may be capturing a strong but noisy signal from a congested tower.
- One room has great signal but another has none. Add a second indoor antenna or switch to a panel antenna aimed at the weak room.
- Outdoor connector corroded after a few months. Strip the connection, apply fresh weatherproof tape, and inspect the cable end for moisture damage.
If you have repositioned both antennas, checked all connections, and the booster still shuts down or shows no improvement, the problem is likely a failed component or a cable with internal damage. At that point, professional diagnosis saves more time than continued DIY troubleshooting.
For a deeper look at diagnosing persistent issues, the cell booster troubleshooting guide from Lowvoltagecorp covers the most common failure patterns in South Florida properties.
Key takeaways
Proper cell booster installation requires correct antenna separation, quality cable runs, and precise outdoor antenna alignment to deliver reliable indoor signal.
| Point | Details |
|---|---|
| Outdoor antenna location | Mount on the roof or a high pole with a clear line of sight to the nearest cell tower. |
| Antenna separation | Maintain at least 20 feet vertical or 50 feet horizontal between outdoor and indoor antennas. |
| Cable quality | Use RG-6 or LMR-400 coax, keep runs short, and weatherproof all outdoor connections. |
| Indoor antenna placement | Position at least 18 inches from the booster in the room where you use your phone most. |
| Alignment for SINR | Sweep the outdoor antenna in quarter-turn increments to maximize signal quality, not just strength. |
What I have learned installing boosters across South Florida homes
Most homeowners focus on which booster brand to buy. That is the wrong question. The brand matters far less than where you put the antennas and how you run the cable. I have seen a mid-range weBoost kit outperform a premium unit simply because the installer took the time to find the right roof location and align the Yagi properly.
South Florida presents specific challenges that most installation guides ignore. Concrete block construction absorbs signal inside the home far more than wood framing. Impact glass, which is standard in most post-2002 construction here, contains a metallic film that blocks cellular frequencies. Dense ficus hedges and mature oak canopies can obstruct the outdoor antenna’s line of sight even from a rooftop. You have to account for all of these factors, not just the distance to the nearest tower.
The installations I have seen fail most often share one trait: the installer prioritized convenience over RF fundamentals. They ran a longer cable because it was easier to route. They placed the indoor antenna near the booster because it was close to an outlet. They skipped the alignment step because the signal bars looked good. Every one of those shortcuts costs performance.
Success in booster installation depends more on RF fundamentals than visible signal bars. Get the donor signal right, separate the antennas correctly, and use quality cable. Everything else is secondary.
— Aaron
Get professional cell booster installation in South Florida
Lowvoltagecorp installs, repairs, and maintains cell boosters for homeowners and renters across South Florida. If your setup is not performing after following these steps, or if your property has complex construction that makes DIY installation difficult, a professional site assessment solves the problem faster than repeated trial and error.
Lowvoltagecorp handles the full cell booster installation workflow from outdoor antenna placement and cable routing to indoor antenna positioning and system testing. The team also covers security cameras, motorized gates, and wired and wireless networks, so you can address multiple low-voltage needs in a single visit. For South Florida homeowners looking to get more from their property’s technology, the South Florida upgrade guide covers what professional installation delivers versus DIY. Contact Lowvoltagecorp to schedule a consultation.
FAQ
What is the minimum antenna separation for a cell booster?
Minimum antenna separation is 20 feet vertically or 50 feet horizontally between the outdoor and indoor antennas. Insufficient separation causes oscillation and automatic booster shutdown.
Can I install a cell booster myself?
Most residential booster kits are designed for self-installation using a ladder, screwdriver, and a smartphone signal app. Complex setups in concrete block homes or multi-unit buildings benefit from professional installation.
Why does my cell booster keep shutting off?
Oscillation is the most common cause. The booster detects its own signal looping back and shuts down to protect the network. Increase the distance between your outdoor and indoor antennas to fix it.
What type of coaxial cable should I use?
Use RG-6 for short indoor runs and LMR-400 for longer building runs. Keep cable runs as short as possible and avoid stacking adapters, which add signal loss and failure points.
Does building material affect cell booster performance in South Florida?
Concrete block walls and impact-rated glass, both common in South Florida construction, block cellular signals more than wood framing. A panel antenna aimed directly at the weak area outperforms a general-purpose dome in these conditions.