A security camera that freezes at the wrong moment or a network that drops during business hours can cost you far more than a service call. Most of the time, the root cause is a wired connection fault that went undetected for weeks or even months. The good news is that testing your wired connections is not a job reserved for IT specialists. With the right tools, a clear process, and some knowledge of South Florida’s unique environmental challenges, property owners and facility managers can catch problems early, protect their investments, and keep every system running at full strength.
Table of Contents
- What you need before you start testing
- Step-by-step: How to physically inspect and test your wired connections
- Advanced testing: Certification and TIA/EIA-568 standards
- Troubleshooting and common issues in South Florida environments
- What most property managers overlook about wired connection testing
- Need expert help or full testing service?
- Frequently asked questions
Key Takeaways
| Point | Details |
|---|---|
| Start with visual checks | Begin by inspecting cables and connectors for physical signs of wear or damage. |
| Use the right tester | Choose a basic cable tester for routine checks and a certification tester for new installations or compliance. |
| Mind South Florida risks | Select weather-rated cables, and secure layouts against humidity and hurricane threats. |
| Record your results | Document each test with labels and digital logs to meet compliance and simplify future maintenance. |
| Troubleshoot with simple tools | Check link lights, run basic network commands, and use speed tests for fast problem solving. |
What you need before you start testing
Before jumping into tests, make sure you have everything you need for safety and accuracy. Showing up to a cable run without the right gear wastes time and can even damage equipment or injure someone working in a ceiling space.
Essential tools and materials:
- Continuity tester (Klein Tools VDV526-100 is a reliable, budget-friendly choice for routine checks)
- Certification tester (Fluke DSX series for advanced installs or warranty documentation)
- Cable labels and a marker for documenting each run
- Flashlight or headlamp for ceiling and wall cavity work
- PPE: Safety glasses, gloves, and a dust mask for attic or plenum spaces
- Patch cables and spare RJ45 connectors in case you need to re-terminate on the spot
Cable standards to know:
| Cable type | Best use | Max speed | Notes |
|---|---|---|---|
| Cat5e | Basic networks, older installs | 1 Gbps | Minimum acceptable standard |
| Cat6 | Modern networks, IP cameras | 10 Gbps (short runs) | Recommended for new installs |
| Cat6A | High-density or long runs | 10 Gbps at 100m | Best for large properties |
| Plenum-rated | Drop ceilings, air-handling spaces | Varies | Required by fire code in many areas |
| Outdoor/UV-rated | Exterior runs, conduit in sun | Varies | Essential in South Florida |
Pro Tip: Always buy 10-15% more cable than your measured run length. South Florida construction often has unexpected routing around concrete beams, rebar walls, and hurricane straps that add distance quickly.
As this testing guide explains, visual inspection is the first step before any electronic test: check for physical damage, secure connections, bent pins, cuts, frays, and confirm cables meet Cat5e or Cat6 standards. Skipping this step means you might run electronic tests on a cable that is visibly broken.
South Florida adds a layer of complexity that most generic guides ignore. Humidity and heat accelerate corrosion on connectors and cable jackets, so outdoor and UV-rated cables are not optional here. They are a baseline requirement. Hurricane prep also means routing cables through conduit, securing them against wind-driven movement, and planning redundant paths so a single damaged run does not take down an entire system.
Power off all devices connected to the cable run before testing. This protects both you and your equipment. Ceiling work in particular carries risk from falling, so use a stable ladder and never work alone in a large or unfamiliar space.
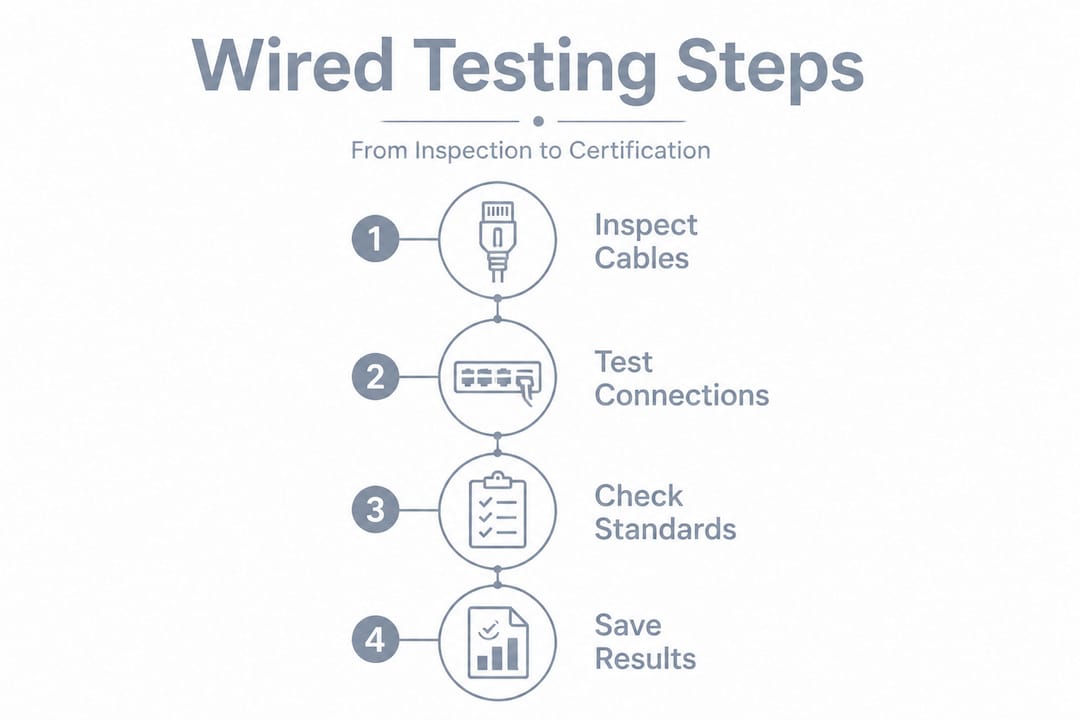
Step-by-step: How to physically inspect and test your wired connections
With your tools in hand and environment prepped, you are ready to start testing. Work through these steps in order so you do not miss anything.
-
Walk the entire cable run visually. Look for kinks, sharp bends, staples driven through the jacket, or areas where the cable passes through a rough edge. Even a small nick in the outer jacket can allow moisture to wick into the cable over time.
-
Inspect both ends of the cable. Check the RJ45 connector for bent or corroded pins. Confirm the cable pairs are in the correct order (T568B is the standard for most commercial and residential installs). A single miswired pair causes intermittent failures that are maddeningly difficult to trace without a tester.
-
Look for signs of water intrusion or corrosion. In South Florida, any cable running through an exterior wall, soffit, or unconditioned attic is at risk. Green or white residue on connectors is a clear sign of moisture damage.
-
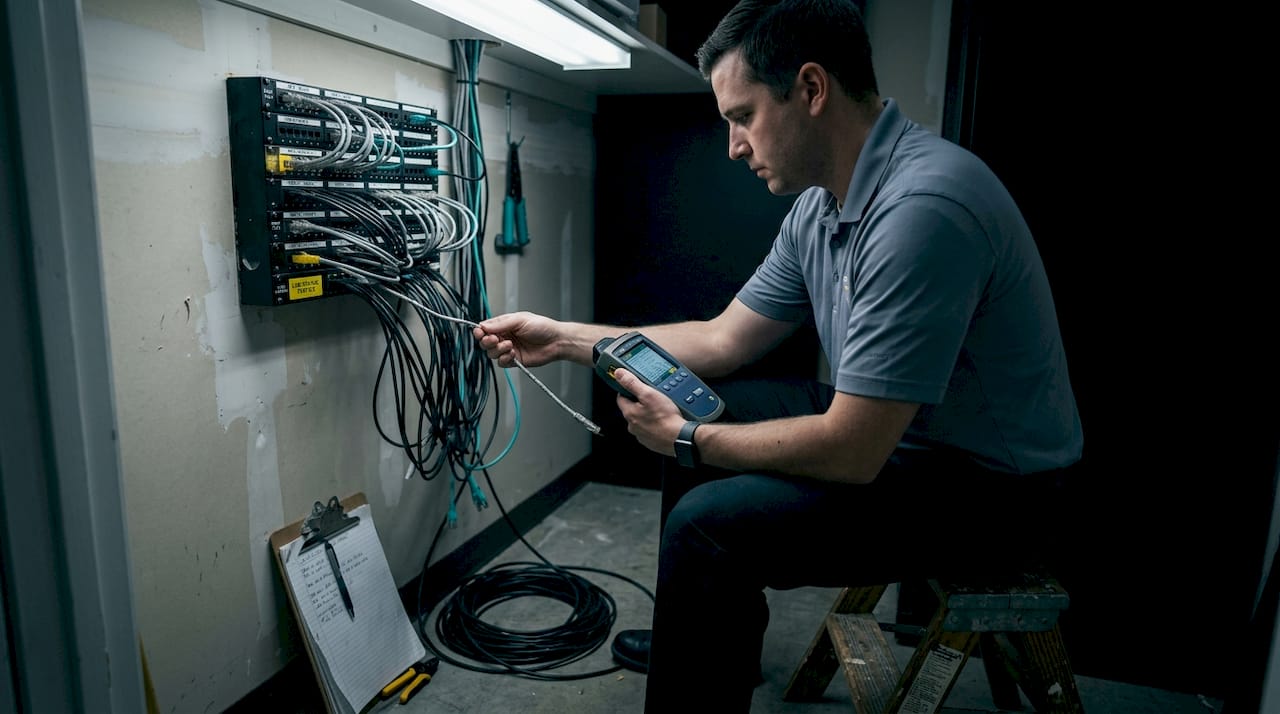
Connect your continuity tester. Plug one end of the cable into the tester unit and the other end into the remote. The tester sends a signal through each wire pair and lights up indicators to show pass or fail. The Klein Tools VDV526-100 is a solid choice for routine property checks because it is simple, accurate, and does not require calibration.
-
Check the link lights on your switch or router. Plug the cable in and look for a solid or blinking green light on both the switch port and the endpoint device. No light means no physical connection. An amber light on a gigabit switch usually means the connection negotiated at a lower speed, which points to a cable or connector issue.
-
Document every result. Write down the cable ID, location, test result, and date. A simple spreadsheet works fine. This log becomes invaluable when you need to track down an intermittent issue or prove compliance to an insurance company or tenant.
A single undocumented cable run can turn a 30-minute repair into a two-day investigation. Label everything before you close up the wall or ceiling.
Pro Tip: Use a label maker to tag both ends of every cable with a matching ID number. When a camera or access point goes down at 2 a.m., you will thank yourself for the five minutes you spent labeling during the install.
As confirmed by wired connection testing resources, checking for physical damage, bent pins, and correct cable standards before running any electronic test saves significant diagnostic time and prevents false results from faulty connectors.
Advanced testing: Certification and TIA/EIA-568 standards
Once the basics are confirmed, advanced testing ensures compliance and long-term reliability. This level of testing is not something every property manager needs every week, but it is essential in specific situations.
When to use a certification tester:
- New cable installations where you need to verify performance before signing off
- When a tenant moves in or out and you need documented proof of network condition
- Warranty claims on cable or installation work
- Any situation where you are pulling permits or working with a general contractor
Required tests under TIA/EIA-568 standards:
| Test parameter | What it measures | Why it matters |
|---|---|---|
| Insertion loss | Signal strength lost over the run | High loss causes slow speeds or dropouts |
| NEXT | Near-end crosstalk between pairs | Interference between adjacent wire pairs |
| Return loss | Signal reflected back toward the source | Indicates impedance mismatches |
| Delay skew | Timing difference between wire pairs | Critical for Gigabit Ethernet |
| ACR-F | Attenuation-to-crosstalk ratio, far end | Overall signal quality indicator |
TIA/EIA-568 certification standards require using the permanent link method for horizontal copper cabling. This means testing the cable run itself, not the patch cords at each end. It gives you a true picture of the installed cable’s performance, not a result inflated or degraded by the test leads.
Pro Tip: Always save your certification test results in the tester’s native file format (not just a screenshot). Florida compliance standards, including those used by school districts and commercial properties, require detailed documentation that includes the tester model, firmware version, cable ID, and pass/fail results for each parameter.
Documenting for compliance is not just about satisfying an inspector. In Florida, detailed records protect you when a contractor disputes their work quality, when an insurance claim involves network infrastructure, or when a tenant claims the network was not functional at move-in. A folder of certified test reports is worth its weight in avoided legal fees.
Troubleshooting and common issues in South Florida environments
Even after following every step, sometimes issues persist. Here is how to troubleshoot and adapt for South Florida conditions.
Common problems and what they look like:
- Intermittent drops: Often caused by a loose connector or a cable that was bent too sharply around a corner. Wiggle the cable near both ends while watching the link light. If it flickers, you found your problem.
- Slow speeds despite a good connection: Check for duplex or speed mismatches between the switch port and the connected device. Set both ends to auto-negotiation to avoid this. Also confirm you are not exceeding the 100-meter maximum run length for Cat6, which is 328 feet.
- No link light at all: Could be a dead switch port, a failed NIC (network interface card), or a completely broken cable. Swap the patch cord first since that is the easiest fix.
- Electromagnetic interference (EMI): If your cable runs near electrical conduit, HVAC equipment, or fluorescent lighting, you may see random packet loss. Use shielded cable (STP or FTP) in those areas.
In South Florida, assume any cable in an unconditioned space is fighting heat, humidity, and salt air. Inspect outdoor runs at least twice a year.
South Florida-specific risks:
Florida’s climate creates conditions that most cabling guides do not address. Humidity and heat speed up corrosion on connectors, especially in outdoor enclosures, eaves, and parking structures. Use gel-filled or waterproof RJ45 connectors for any exterior termination. UV radiation degrades standard cable jackets within a year or two, so outdoor-rated cable is mandatory for any exposed run.
Hurricane season adds another layer of risk. Vibration from wind can loosen connectors over time. After any major storm, walk all exterior cable runs and check every outdoor enclosure for water intrusion before assuming your network or camera system is fine.
Quick diagnostic commands to run from a laptop or workstation:
- "ipconfig /all
on Windows (orifconfig` on Mac/Linux) to confirm the device has a valid IP address and is connected at the expected speed - Ping the gateway to check basic connectivity
- Run a speed test at Speedtest.net to compare actual throughput against expected performance
- Use the built-in Windows or macOS network troubleshooter as a first-pass diagnostic before pulling out hardware tools
Statistic to keep in mind: Studies show that the majority of network outages in commercial buildings trace back to physical layer issues, meaning the cables and connectors, rather than software or configuration problems. Testing the physical layer first saves hours of chasing the wrong cause.
What most property managers overlook about wired connection testing
Here is the uncomfortable truth: the cable tester sitting in the supply closet does not help anyone if it only comes out after something breaks. Most property managers treat wired connection testing as a reactive task, something you do when a camera goes offline or a tenant complains. That approach is exactly backwards.
The real value of testing is in the before. A 20-minute walk-through with a continuity tester every six months catches corroded connectors before they fail, finds cables that were damaged during unrelated construction, and gives you a documented baseline that proves your network was in good shape before a tenant moved in.
Documentation is where most managers fall short. Florida compliance standards require detailed test submissions for structured cabling, but even properties that are not subject to those specific standards benefit from keeping records. When a security camera misses an incident and someone asks whether the system was functioning properly, a dated test log is your best defense.
The combination of digital logs and physical labels is more powerful than either alone. Digital logs let you search and sort by date, location, or result. Physical labels on the cable itself let any technician, including one who has never been to your property before, identify and trace a run in minutes instead of hours.
Proactive testing also changes how you budget. When you know the condition of every cable run, you can plan replacements before they become emergencies. An emergency re-pull during a busy season costs three to five times more than a scheduled one. That math alone justifies a twice-yearly inspection routine.
Need expert help or full testing service?
If your property has more cable runs than you can manage solo, or if you are facing a compliance deadline, a warranty dispute, or a new installation that needs certified documentation, it is time to bring in a professional.
At Low Voltage Electrician, we handle the full range of wired and wireless network testing, security camera cabling, motorized gate wiring, and cell booster installation across South Florida. We bring certification-grade testers, documented results, and hands-on experience with Florida’s specific environmental challenges. Whether you need a one-time audit or ongoing maintenance support, Low Voltage Corp has the tools and local knowledge to keep your systems running reliably. Reach out today to schedule a site assessment and get documentation you can actually use.
Frequently asked questions
How do I know if my wired connection is working optimally?
Check for secure physical connections and solid link lights, then run a speed test to confirm your actual throughput matches what your network plan promises.
Can Florida weather affect my wired network performance?
Yes. Humidity and heat cause corrosion on connectors and degrade cable jackets, so use outdoor or UV-rated cables for any run exposed to the elements and inspect them at least twice a year.
What’s the maximum distance for a Cat6 cable run?
Cat6 cable runs must stay within 100 meters or 328 feet to maintain reliable performance and avoid signal degradation.
Do I need a certification tester for every property?
A basic continuity tester handles routine checks well, but you need a certification tester for new installs, warranty claims, or any situation requiring documented compliance.